Grin Mining Pool — GPU Mining — How To

Overview
1. Install prerequisites

2. Get the miner source code and build it
3. Configure your miner to use stratum.pool.bitgrin.io
4. Start your miner and Verify its running
5. Log in and check your account on www.pool.bitgrin.io


Notes:

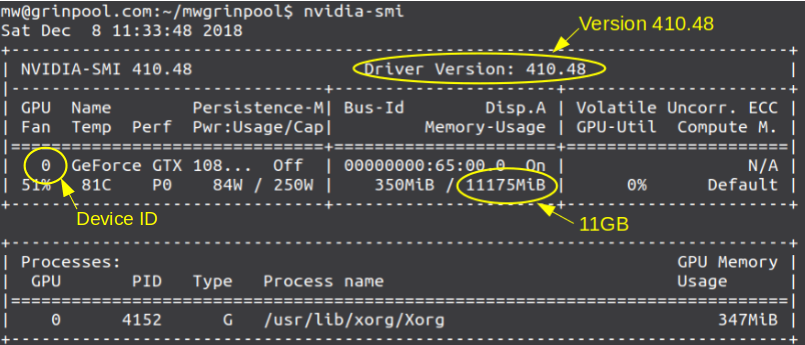
GPU mining currently requires 7 GB of memory. If your video card has less than 7 GB of RAM you will not be able to use it for mining BitGrin until a “lean” version of the miner is released. Coming Soon (tm).
Ubuntu 18 with an Nvidia 1080ti GPU is used in this example, you may need to adjust commands and package names if you are using MacOS,a different flavor of Linux, or different GPU hardware.
Ok, lets get started.

1. Create a working directory and install prerequisites


mkdir ~/bitgrinpool
cd ~/bitgrinpool
sudo apt-get install -y curl git cmake make zlib1g-dev pkgconf \
ncurses-dev libncursesw5-dev linux-headers-generic g++ \
libssl-dev
curl https://sh.rustup.rs -sSf | sh
source $HOME/.cargo/env

Check your Nvidia hardware ID, memory and driver version:

Nvidia CUDA Toolkit Version 9 or greater is required, and the Nvidia driver version must match your CUDA version. If you don’t have Nvidia CUDA ToolKit installed, you will need to install the correct version now. You can find additional information on the Nvidia Developers site: https://developer.nvidia.com/cuda-downloads


nvidia-smi
nvidia-smi shows Driver Version, Memory, and ID

Check your Nvidia CUDA Toolkit version:


nvcc -V
The Nvidia compiler reports the CUDA toolkit version

2. Get the miner source code and build it


git clone https://github.com/mimblewimble/grin-miner.git
cd grin-miner
git submodule update --init

Enable building the miners CUDA plugins:


sed -i 's/^\(cuckoo_miner.*\)}/\1, features = ["build-cuda-plugins"] }/' Cargo.toml
Build it:
cargo build --release

3. Configure your miner to use stratum.pool.bitgrin.io
Configure where to mine:


sed -i 's/stratum_server_addr.*/stratum_server_addr = "stratum.pool.bitgrin.io:3333"/' grin-miner.toml

Configure your Mining Account:

Enter a username and strong password to use for your account.


printf "\nUsername: " && read username && sed -i 's/.*stratum_server_login.*/stratum_server_login = "'$username'"/' grin-miner.toml
printf "\nPassword: " && read password && sed -i 's/.*stratum_server_password.*/stratum_server_password = "'$password'"/' grin-miner.toml

Configure what to run:

Enable the Cuckaroo29 CUDA plugin:


sed -i 's/^plugin_name =.*/plugin_name = "cuckaroo_cuda_29"/' grin-miner.toml

Set the GPU device number (from nvidia-smi command above):


printf "\nGPU ID: " && read gpuid && sed -i 's/^nthreads =.*/device = '$gpuid'/' grin-miner.toml

4. Start your miner and Verify its running

./target/release/grin-miner
Grin Miner TextUI — 1. Connected, 2. Mining status and rate

5. Check your account
Open https://www.pool.bitgrin.io in your web browser and select the “Stats” submenu under “Miner”.


Selecting Miner Stats page

After you enter your username and password, you will see your mining information. After a few minutes of mining you will see your graph rate and shares data begin to populate.


Thats it, you are mining BitGrin on the bitgrin pool!

Next you may want to read about How To Configure Payments.

BitGrin is a “Minimal implementation of the MimbleWimble protocol” focused on privacy and scalability with economics from Bitcoin. BitGrin is a fork of Grin with improved economics.